How to Post a Link, Change Garden Photos or other settings
Be sure to visit our new Facebook page, if you haven't already.
To become a member of ALFF simply click on the "Like" button when you arrive at the page.
Be sure to invite all your Fairyland friends, too!
We look forward to seeing you there!
http://tinyurl.com/NEW-ALFF-FANPAGE
Please Note: ALFF is ONLY a Fan Club hosted by volunteers who have researched the Fairyland game to help YOU play
smarter, and not harder. We are not affiliated with the game or its developer.
|
Ever thought about what wildlife is attracted by a certain garden set-up?
You can check it on the wildlife calculator http://myarduinoprojects.com/wildlifecalculator/index.html |
If any text is ever too small to read comfortably, press the CTRL and the + key at the same time to increase the size.
Pressing CTRL and the - key at the same time will make it smaller.
Pressing CTRL and the - key at the same time will make it smaller.
There have been many requests for advice on how to use ALFF Achievement certificates, ALFF Love photos, post links, and make your photos visible to everyone visiting your gardens. We have put together this little “How To” guide to help out the not so computer literate fairies out there! (we were all there once). We have done our best to keep the instructions clear and simple for everyone to follow. The instructions shown are based on a PC user, using the Firefox web browser, so if you are using a Mac or a different browser you may find that the wording is slightly different in some instances. However, the basic principle should be the same.
Your garden can show three different images; your profile picture, your fairy picture and your garden picture:
Your profile picture is the same as your Facebook profile picture, and is shown as the left hand picture just below your garden and the “Garden Owners” title bar.
This is also the picture that is shown when you leave a message in someone else’s garden.
Your fairy picture is shown to the right of your profile picture
Your garden picture is shown under the “About This Garden” title bar, below, and to the right of your profile and fairy pictures.
HOW TO save a picture to your computer
• Open the page with the picture you wish to use, so that the image is on your screen.
• Hold your mouse pointer over the image and click the right button once, a menu should appear
• Select “Save image as” (or similar depending on the system you are using).
• A window will appear that allows you to browse your computer and select where you would like to save the image to.
(If you don’t already have a folder for your pictures, or you are in any doubt, use the default “My Pictures” folder).
• Once you have selected your desired location, simply click “Save”, the image is now stored on your computer.
Editing your Garden Picture
|
Go to your garden page, and click the [Edit Picture] link, located just above your current garden picture (if you have one). This will take you to a new page. From the page that this link takes you to, select the album which contains the picture you require, then select the picture you want. Select the image you require and it will now be your garden picture. (Selecting the image will take you straight to your garden, showing your new picture!) |
HOW TO change your Garden Name and Description
• Go to your garden page, and click the [edit name/description] link, located in the "About This Garden" below your Garden Owner section.
• This will take you to a new page showing 2 sections 1.to change your Garden Name and 2. Description.
• This is where you type in what you want and then click the green box where it says "Save Garden Details".
HOW TO change your Fairy Picture or Name
• As with the garden picture, you will need to have the image you wish to use saved on your computer. Do this by following the steps above.
• On any Fairyland page you will see a red mushroom in the top left hand corner, hover your mouse over it and a box will appear.
• On the left hand side if the box, below the picture shown it will say “Change Fairy’s Name - Change Fairy's Picture” in blue writing, click on the link that you wish to change.
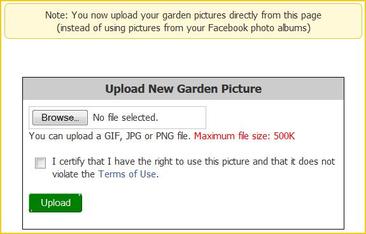
• For the Fairy Picture click on the link and select the “Browse” button; this will open a box that will allow you to navigate to
the folder where you previously saved your image.
• Select your required image and either double click on it, or click “Open”.
• Check the box to certify that you may use the image.
• Click the green “Upload” button, and your image will now become your fairy picture.
HOW TO change your Profile Picture
Either
• Tag yourself in the picture you wish to use
• Select “Make this my profile picture” from the list displayed to the right, below the image
Or
• Follow the previous steps for saving the image to your computer
• Follow the previous steps for uploading the image to Facebook
• Select “Make this my profile picture” from the list displayed to the right, below the image
HOW TO Post a Link
• Open the page you wish to link to, e.g. your garden.
• In the address bar on your browser, highlight the text in the address bar, (which is shown in the browser toolbar, at the top of your page) by holding down your left mouse button and dragging the pointer over the text. Let go of the button and the text should be highlighted with a bar of colour (usually blue, or grey).
• Hover your mouse pointer over the selected text and click the right mouse button, the select “copy”. Alternatively you can hold down the “Ctrl” key and simultaneously press the “C” key.
• Go to where ever you would like to post the link, e.g. the group wall, right mouse click again and select “Paste”. Alternatively you can hold down the “Ctrl” key and simultaneously press the “V” key.
• Then post your comment as usual, the text will then become a link in blue writing, which can be clicked on to go directly to that page.


